by Rohith Devegowda
Enabling auditing and monitoring capabilities for reporting is crucial for IT management and governance regardless if it’s enterprise level or department level deployment. In OBIEE 11g, Oracle added more data to audit and monitor, including more BI Publisher specific information. This article describes the steps for Enabling Usage Tracking for BI Publisher and how to visualize usage tracking data.
Sections
- How to enable auditing from BI Publisher UI
- How to run RCU to create Audit Schemas
- How to create JDBC connection with Weblogic console
- How configure the Audit Policy Settings
- How register the Audit Storage Database to Your Domain
- How audit events in an Audit Table

1) How to enable Auditing from BI Publisher UI:
- Go to Administrator page and click 'Server Configuration' menu (Step 1)
- Scroll down to the bottom, and check 'Enable Monitor and Audit', then hit 'Apply' button (Step 2).
- Step 1:
![]()
- Step 2:
![]()
2) How to run RCU to create Audit Schemas:
- Go to $RCU_HOME/bin and execute the ‘rcu’ command
- Choose Create at the starting screen and click Next.
- Enter your database details and click Next.
- Choose the option to create a new prefix, for example ‘BIP’ etc…
- Select 'Audit Services' from the list of schemas.
![]()
- Click next and accept the tablespace creation.
- Click Finish to start the process.
3) How to create JDBC Connection with WebLogic Console:
- Connect to the Oracle Weblogic Server administration console:http://hostname:port/console (e.g.)
- Under Services, click the Data Sources link.
![]()
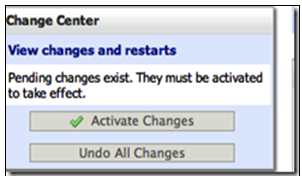
- Click ‘Lock & Edit’ so that you can make changes (If not done yet)
![]()
- Click New –> ‘Generic Datasource’ to create a new data source.
- Enter the following details for the new data source:
Name: Enter a name such as ‘bip_audit_datasource’.
JNDI Name: jdbc/ bip_audit_datasource
Database Type: Oracle
![]()
- Click Next and select ‘Oracle's Driver (Thin XA) Versions: 9.0.1 or later’ as Database Driver (if you’re using Oracle database), and click Next.
- The Connection Properties page appears. Enter the following information:
Database Name: Enter the name of the database (SID) to which you will connect.
Host Name: Enter the hostname of the database.
Port: Enter the database port.
Database User Name: This is the name of the audit schema that you created in
RCU. The suffix is always IAU for the audit schema.
Password: This is the password for the audit schema that you created in RCU.
![]()
- Click Next.
- Accept the defaults, and click Test Configuration to verify the connection.
- Click Next
- Check listed servers where you want to make this JDBC connection available.
- Click ‘Finish’
- Make sure you click ‘Activate Changes’ at the left hand side top to take the new JDBC connection in effect.
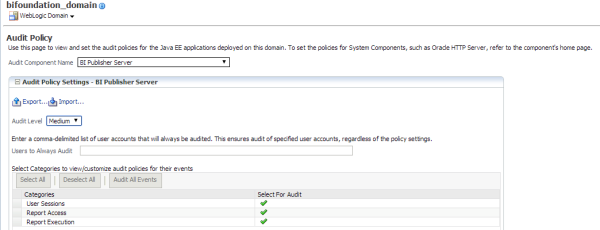
4) How to configure the Audit Policy Settings:
- In Oracle Fusion Middleware Control, under WebLogic Domain, right-click bifoundation_domain. From the menu, click Security and click Audit Policy, as shown in the pic:
![]()
- The Audit Policy table displays all the audited applications under the bifoundation_domain. Set the Audit Level to enable auditing for BI Publisher, as shown in the pic:
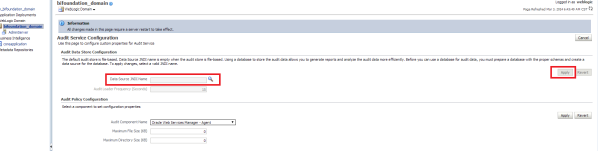
5) How to register the Audit Storage Database to Your Domain:
- Log in to EM console and under WebLogic Domain, right-click bifoundation_domain navigate to the security provider configuration :
![]()
- Click of the Audit Service and click on configure:
![]()
- Click on the JNDI source, select the Audit Source and click on Apply.
6) How to audit events in an Audit Table:
We can use the Audit tables to do the Modelling in RPD or creating the Data Model in the BI Publisher. Here are the important Auditing Base Tables that are mainly used:
- IAU_BASE
- XMLPSERVER
The events that are audited for the BI Publisher server are:
- User Login
- User Logout
- Report Request
- Scheduled Report Request
- Report Republish
- Report Data Download
- Report Download
- Report Data Process
- Report Rendering
- Report Delivery
The following area includes some sample queries and screenshots:
Ex:
select "IAU_BASE"."IAU_COMPONENTTYPE" as "IAU_COMPONENTTYPE",
"IAU_BASE"."IAU_EVENTTYPE" as "IAU_EVENTTYPE",
"IAU_BASE"."IAU_EVENTCATEGORY" as "IAU_EVENTCATEGORY",
"IAU_BASE"."IAU_TSTZORIGINATING" as "IAU_TSTZORIGINATING",
to_char("IAU_TSTZORIGINATING", 'YYYY-MM-DD') IAU_DATE,
to_char("IAU_TSTZORIGINATING", 'DAY') as IAU_DAY,
to_char("IAU_TSTZORIGINATING", 'HH24') as IAU_HH24,
to_char("IAU_TSTZORIGINATING", 'WW') as IAU_WEEK_OF_YEAR,
"IAU_BASE"."IAU_INITIATOR" as "IAU_INITIATOR",
"IAU_BASE"."IAU_RESOURCE" as "IAU_RESOURCE",
"IAU_BASE"."IAU_TARGET" as "IAU_TARGET",
"IAU_BASE"."IAU_MESSAGETEXT" as "IAU_MESSAGETEXT",
"IAU_BASE"."IAU_FAILURECODE" as "IAU_FAILURECODE",
"IAU_BASE"."IAU_REMOTEIP" as "IAU_REMOTEIP"
from "BIP_IAU"."IAU_BASE" "IAU_BASE"
where "IAU_BASE"."IAU_COMPONENTTYPE" = 'xmlpserver'
Sample Screenshots of Reports:
![]()
![]()
References:
http://docs.oracle.com/cd/E28280_01/bi.1111/e22255/diagnostics.htm#BIPAD343
 |
Rohith Devegowda is a Business Intelligence Consultant at KPI Partners and works with the expert team within the KPI Partners Offshore Technology Center. He is a reporting an analytics specialist whose areas of professional focus also include Oracle Business Intelligence Enterprise Edition and the Oracle BI Applications. Check out Rohith's blog at KPIPartners.com. |