by Ramana Kumar Gunti
Data Security in Snowflake using CLS
Large companies and professional businesses have to make sure that data is kept secure based on the roles and responsibilities of the users who are trying to access the data. One way to protect data is to enforce Column Level Security (CLS) to ensure that people can only access what they are supposed to see.
In this article, We will show how the Column Level Security can be implemented by using one of the Snowflake feature Data Masking Policy. So, Let's get started!!
Column Level Security (CLS)
Column Level Security in Snowflake allows to mask the columns which contain sensitive/confidential data and it can be achieved by creating a Data Masking policy at the column level.
Dynamic Data Masking uses the masking policies to mask the data in the selective columns in a table or view. This means the actual data in the table is not masked (no static masking) but while querying the table, based on user role/user group we apply masking policies to show either the masked/unmasked actual data for authorized users.

Requirement
Let us build a requirement to demonstrate CLS features in snowflake.
Requirement 1: HR operations team can view only non-confidential employee details with masked salary.
Requirement 2: HR manager views all employee details including salary info.
In This Topic:
Step - 1: Data Setup
Step - 2: Users Setup
Step - 3: Secure View
Step - 4: Masking Policy
Step - 5: Test-Run
1. Data Setup
Create the following EMPLOYEE, REPORTING_HIERARCHY Tables and seed them with the initial data.
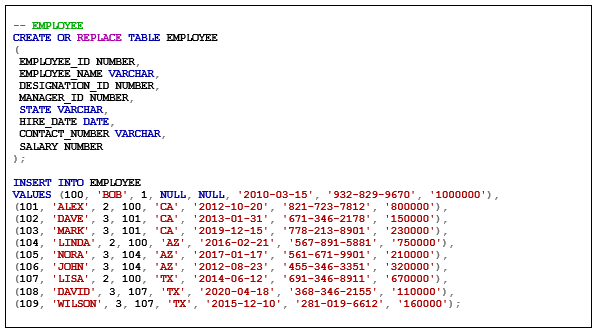
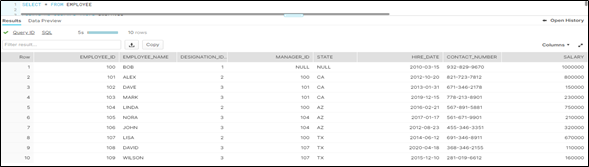
EMPLOYEE
The employee table identifies every employee by an employee identifier and lists basic personnel information with confidential salary information.
The employee table is created with the following CREATE TABLE statement and inserts data using the INSERT statement:
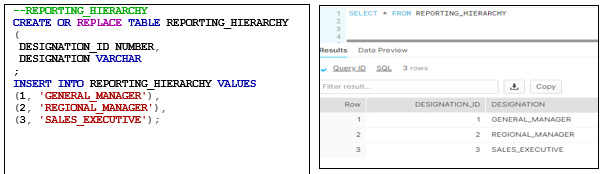
REPORTING_HIERARCHY
The table describes the designations in the organization.
The REPORTING_HIERARCHY table is created with the following CREATE TABLE statement and inserts data using the INSERT statement:
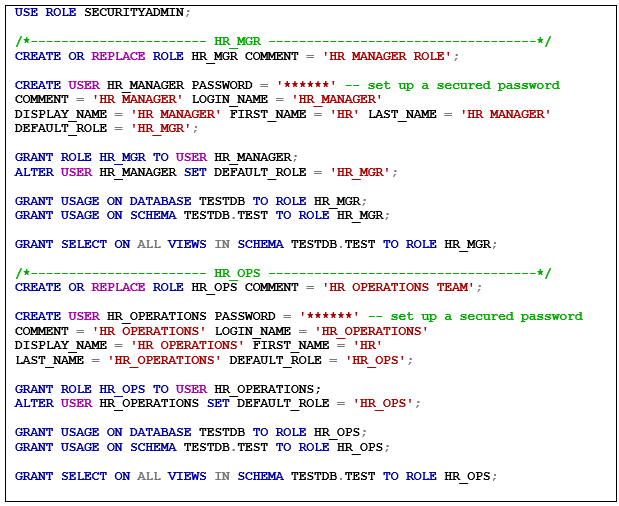
2. Users Setup
Created the following roles (HR_MGR & HR_OPS) and user accounts (HR_MANAGER/HR_OPERATIONS) in snowflake, assign the appropriate roles for each user account.
- HR_MGR/HR_MANAGER
- HR_OPS/HR_OPERATIONS
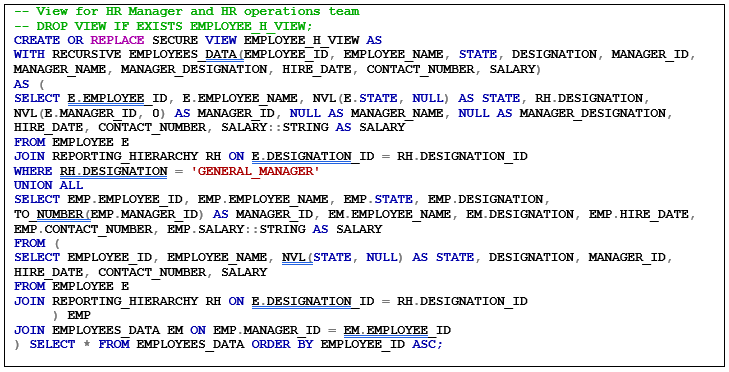
3. Secure View
Created secure view using the tables in the above step and it will provide the details of the complete organization including confidential salary details.
- Employee Hierarchy View
4. Masking Policy
Create the masking policy to prevent an unauthorized user from viewing confidential information such as salary.

5. Test-Run
Now it is time to test our requirements with the data we have created.
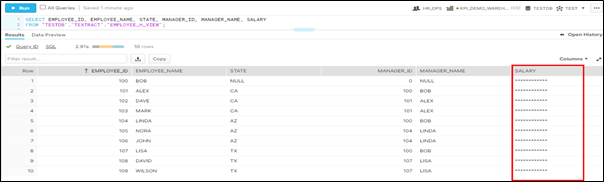
Requirement - 1:
- Assign the column masking policy to the secured view, created in the earlier step.

- When HR Operations Team login into snowflake client using below credentials
User: HR_OPSPassword : ******
-
You should be able to view the salary column is masked since the HR operations team shouldn't see the confidential details and it fulfill the Requirement 1.

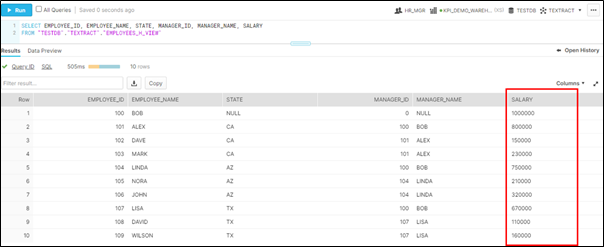
Requirement 2:
- When HR_MANGER login into snowflake client using below credentials
User: HR_MANAGER
Password : ****** - You should be able to view the salary details as well since the HR Manager should see all the confidential details and it fulfill the Requirement 2.

In-order to un-set the masking policy, you can use the below command.

Conclusion
The example described above illustrates the process of the Column Level Security by using built-in Data Masking policy and it masks the sensitive/confidential information during the query runtime. There are no changes to original column values when masking policies applied.
I hope this blog gave a preliminary understanding of the most important aspect of Column Level Security in Snowflake. Please feel free to provide your comments/suggestions.
Signing-off until I post another blog next time.
Ramana Kumar Gunti is a Manager at KPI Partners and has 15 Years of experience in Big Data echo systems, Modelling and Cloud Analytics. He has extensively worked on Big Data, Cloud data warehouse and cloud analytics projects using Hadoop, Snowflake, python and Airflow. He is very enthusiastic to learn and explore the new tools and technologies and be updated with all the features of the existing products.