by Santoshkumar Lakkanagaon
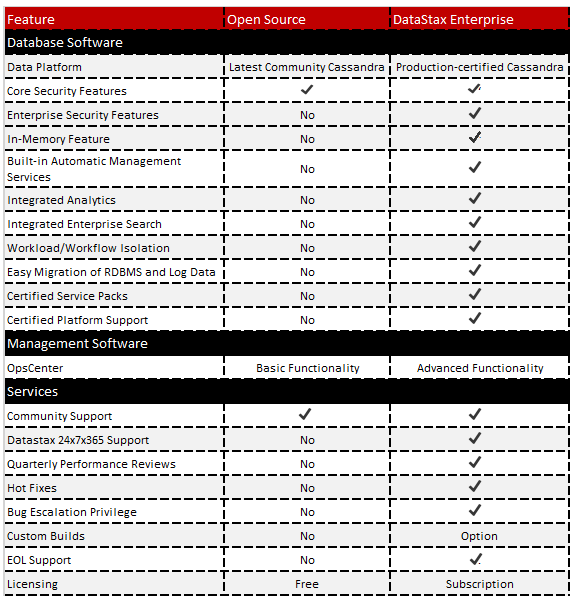
What are the different types of Cassandra distributions available?
- Open Source Apache Cassandra (GitHub)
- DataStax Community Edition (free for development and production)
- DataStax Enterprise with OpsCenter, DevCenter and Drivers (free for development and license required for production)
What are the prerequisites for installing Cassandra?
- Install the latest Java 7 release (preferably 64-bit)
- Configure JAVA_HOME =/usr/local/java/jdk1.7.0_xx
- Install Java Native Access (JNA) libraries (prior to Cassandra 2.1)
- Synchronize clocks on each node system
- Disable swap
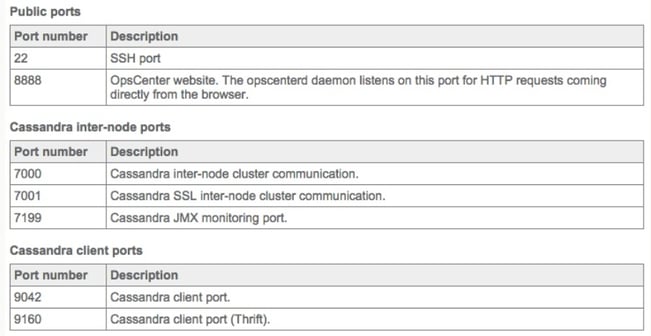
- Verify that the following ports are open and available
How to install Cassandra?
Cassandra can be installed as package provided by DataStax:
- RPM on *nix using yum
- DEB on *nix using apt-get
- MSI on Windows
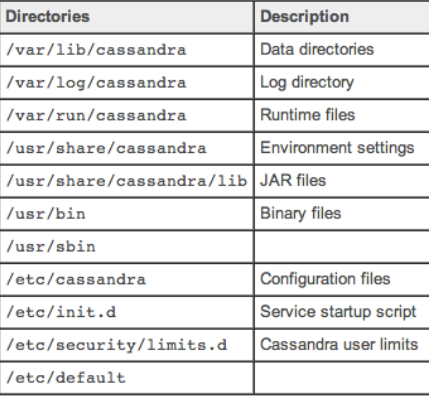
Package installation creates various folders as shown in the following figure:
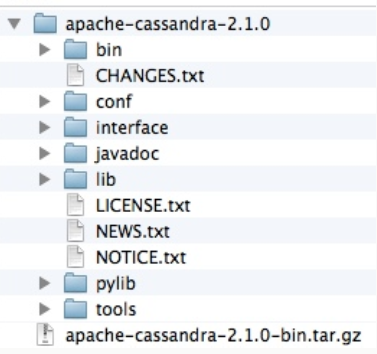
There is Tarball installations as well for Cassandra available in open source and DataStax. It creates the following folders in a single location.
- bin: Executables (Cassandra, cqlsh, nodetool)
- conf: Configuration files (Cassandra.yaml, Cassandra-env.sh)
- javadoc: Cassandra source documentations
- lib: Library dependencies (jars)
- pylib: Python libraries (cqlsh written in Python)
- tools: Additional tools (e.g. Cassandra-stress which stresses a Cassandra cluster)
Key configuration files used in Cassandra:
- yaml: primary config file for each instance (e.g. data directory locations, etc.)
- cassandra-env.sh: Java environment config (e.g. MAX_HEAP_SIZE, etc.)
- xml: system log settings
- cassandra-rackdc.properties: config to set the Rack and Data Center to which this node belongs
- cassandra-topology.properties: config IP addressing for Racks and Data Centers in this cluster
- bin/cassandra-in.sh: JAVA_HOME,CASSANDRA_CONF, CLASSPATH
Key properties of the Cassandra.yaml file:
- cluster_name (default: 'Test Cluster'): All nodes in a cluster must have the same value
- listen_address (default: localhost): IP address or hostname other nodes use to connect to this node
- rpc_address / rpc_port (default: localhost / 9160): listen address / port for Thrift client connections
- native_transport_port (default: 9042): listen address for Native Java Driver binary protocol
- commitlog_directory (default: /var/lib/cassandra/commitlog or $CASSANDRA_HOME/data/commitlog): Best practice to mount on a separate disk in production (unless SSD)
- data_file_directories (default: /var/lib/cassandra/data or $CASSANDRA_HOME/data/data): Storage directory for data tables (SSTables)
- saved_caches_directory (default: /var/lib/cassandra/saved_caches or $CASSANDRA_HOME/data/saved_caches): Storage directory for key and row caches
Key properties of the Cassandra-env.sh file:
JVM Heap Size settings:
MAX_HEAP_SIZE=�value�

HEAP_NEWSIZE=�1/4 MAX_HEAP_SIZE�
JMX_PORT= 7199 (Default)
Key properties of the Cassandra-env.sh file:
- Cassandra log location: Default location is install/logs/system.log (binary tarball) or /var/log/cassandra/system.log (package install)
- Cassandra logging level: Default is set to INFO
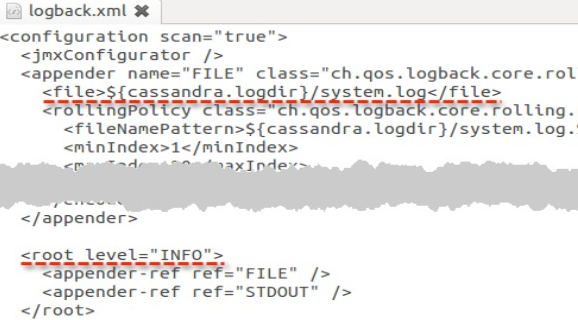
I am going to use tarball installation DataStax community edition for installing Cassandra.
DataStax virtual machine can be downloaded here which is package of Ubuntu OS, Java and DataStax Community Edition tarball installation files.
To use DataStax VM, we must install one of the following supported virtual environments on our system:
- Oracle Virtual Box (4.3.18 or higher)
- VMware Fusion
I used Oracle Virtual Box and imported the DataStax VM appliance.
Once you import, a login screen will appear and a DataStax user is created by default. The password is
DataStax.
Once you login, you can see the Ubuntu desktop and Cassandra tarball installation folder.
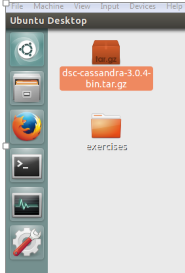
Now we will see step-by-step how to install Cassandra or create a node:
Step1: Open the terminal and navigate to Cassandra tarball binary folder
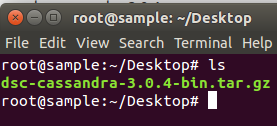
Step 2: Extract the files from tar.gz folder using the following commands and move the contents to the new folder node1
tar -xf dsc-cassandra-3.0.4-bin.tar.gz
mv dsc-cassandra-3.0.4 node1

Step 3: Open the new folder node1 and you can see the following folders under it.

Step 4: Navigate to the node1/bin folder and you can see executable files. The frequently used ones are Cassandra, cqlsh, and nodetool.
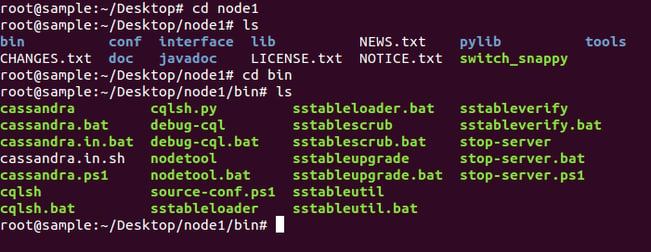
Step 5: Navigate to node1/conf folder and you can see configuration files. The most important and frequently used one is cassandra.yaml.
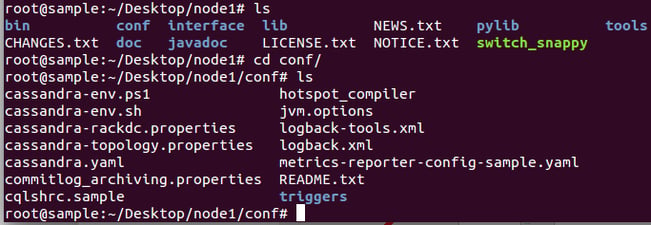
Step 6: So we have all the folders and files extracted from tarball installation folder, before starting Cassandra instance and need to check few key properties in configuration files. Navigate to node1/conf folder and open the Cassandra.yaml file.
Look for the following key properties in the file. Most of the properties are unchanged except for one i.e. endpoint snitch from SimpleSnitch to GossipingPropertyFileSnitch.
Note: SimpleSnitch is used for single data center cluster whereas GossipingProprtyFileSnitch is used for multi-data center
cluster_name: 'Test Cluster'
num_tokens: 256
listen_address: localhost
rpc_address: localhost
rpc_port: 9160
native_transport_port: 9042
seeds: "127.0.0.1"
endpoint_snitch: GossipingPropertyFileSnitch
Save the file and exit.
Note: num_tokens is set to 256 - any value greater than 1 is treated as virtual node so that token distribution will happen automatically.

Step 7: Once we change endpoint_snitch property, we can change data center and rack name in cassandra-rackdc.properties file.
By default, Data center and Rack names are set to dc1 and rack1, I have changed it to Asia and South respectively.
dc=Asia
rack=South
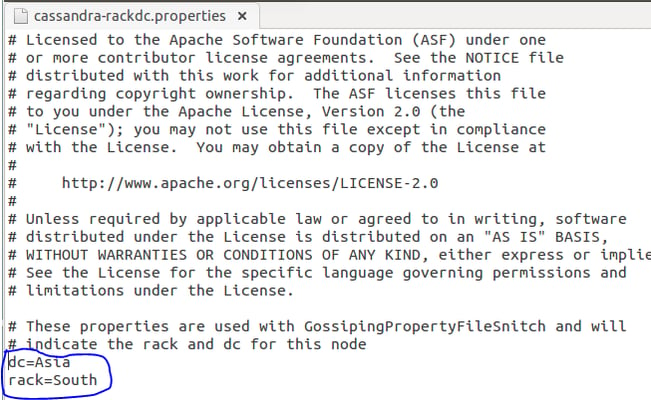
Step 8: Next we need to change Java Heap Size settings in the cassandra-env.sh file
Uncomment these 2 properties in the file. I have changed the value given below, kept it low size for the demo purpose. Save the file and exit.
MAX_HEAP_SIZE = �128M�
HEAP_NEWSIZE= �32M�

In development and production environment, we need to select MAX_HEAP_SIZE based on our system memory available. The calculation is as follows.

For HEAP_NEWSIZE= of MAX_HEAP_SIZE
Step 9: After all the configurations are done, we need to start the Cassandra instance i.e. node1, navigate to node1/bin folder and run the Cassandra executable file.

You can see the message INFO 13:54:50 Node localhost/127.0.0.1 state jump to NORMAL i.e. the Cassandra instance has started and is up and running.
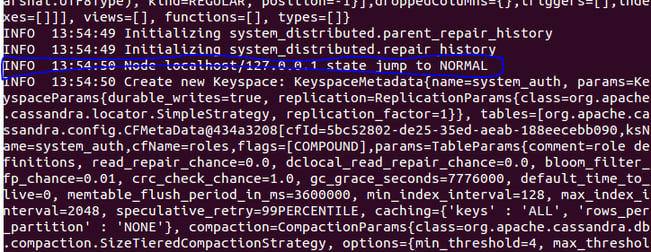
Hit enter to come back to command mode.
Step 10: Check the status of the node1 using nodetool utility.
./nodetool status

You can see process status, listening address, tokens, host ID, data center and rack name of node1 using the above command.
Step 11: Check the token distribution on node1 using ./nodetool ring command
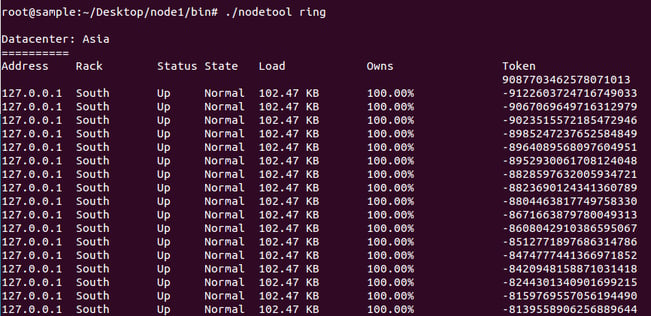
How to add a node in another data center under the same cluster?
For the purpose of a demo, I am creating a second node in the same system with a different address but generally for development and production environment, we should configure one node for one system in a cluster.
So to create a second node, repeat a few of the steps from 1 to 11 to change a few values. The changes are as follows.
Step 2: move the extracted file to node2
mv dsc-cassandra-3.0.4 node2

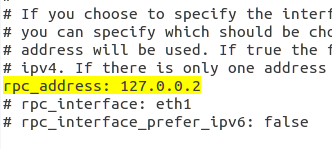
Step 6: Change the listen_address and rpc_address in Cassandra.yaml. As it is a different node, we can't use the same IP address. As you can see in the screenshots above, node1 address is 127.0.0.1.
Now for node2, change it to 127.0.0.2
Also add node2 address to seed list, we can also add node1 address also to seed list, basically seed can useful for a node to know where other node belongs (i.e. which data center and rack).
listen_address: 127.0.0.2
rpc_address: 127.0.0.2
seeds: "127.0.0.1, 127.0.0.2"


Step 7: Change the Data center and Rack name in cassandra-rackdc.properties file
dc = North America
rack = US

Step 8: Additionally, we need to change the JMX_PORT number in the cassandra-env.sh file
In node1, JMX_PORT is 7199, and in node2, we need to change it to 7299
JMX_PORT="7299"

Steps 9, 10 and 11: Starting node2 and checking its status.


You can see node1 under Asia DC and Node 2 under North America DC.
Note: For adding a new node in the same data center, use the same name as where you want it else specify a new name.
Why do we need multi-data center?
- Ensures continuous availability of your data and applications by replicating the data in multiple data centers - so that if one crashes, there will be another data center to back it up
- Improves performance by accessing data from the local data center
- Improves analytics as we can have a dedicated data center just for analysing the data and doesn't impact performance of other data centers
Santosh is a certified Apache Cassandra Administrator and Data Warehousing professional with expertise in various modules of Oracle BI Applications working from KPI Partners Offshore Technology Center. Apart from Oracle, Santosh has worked on Salesforce integration and analytics projects.



Comments
Comments not added yet!